ベンチ
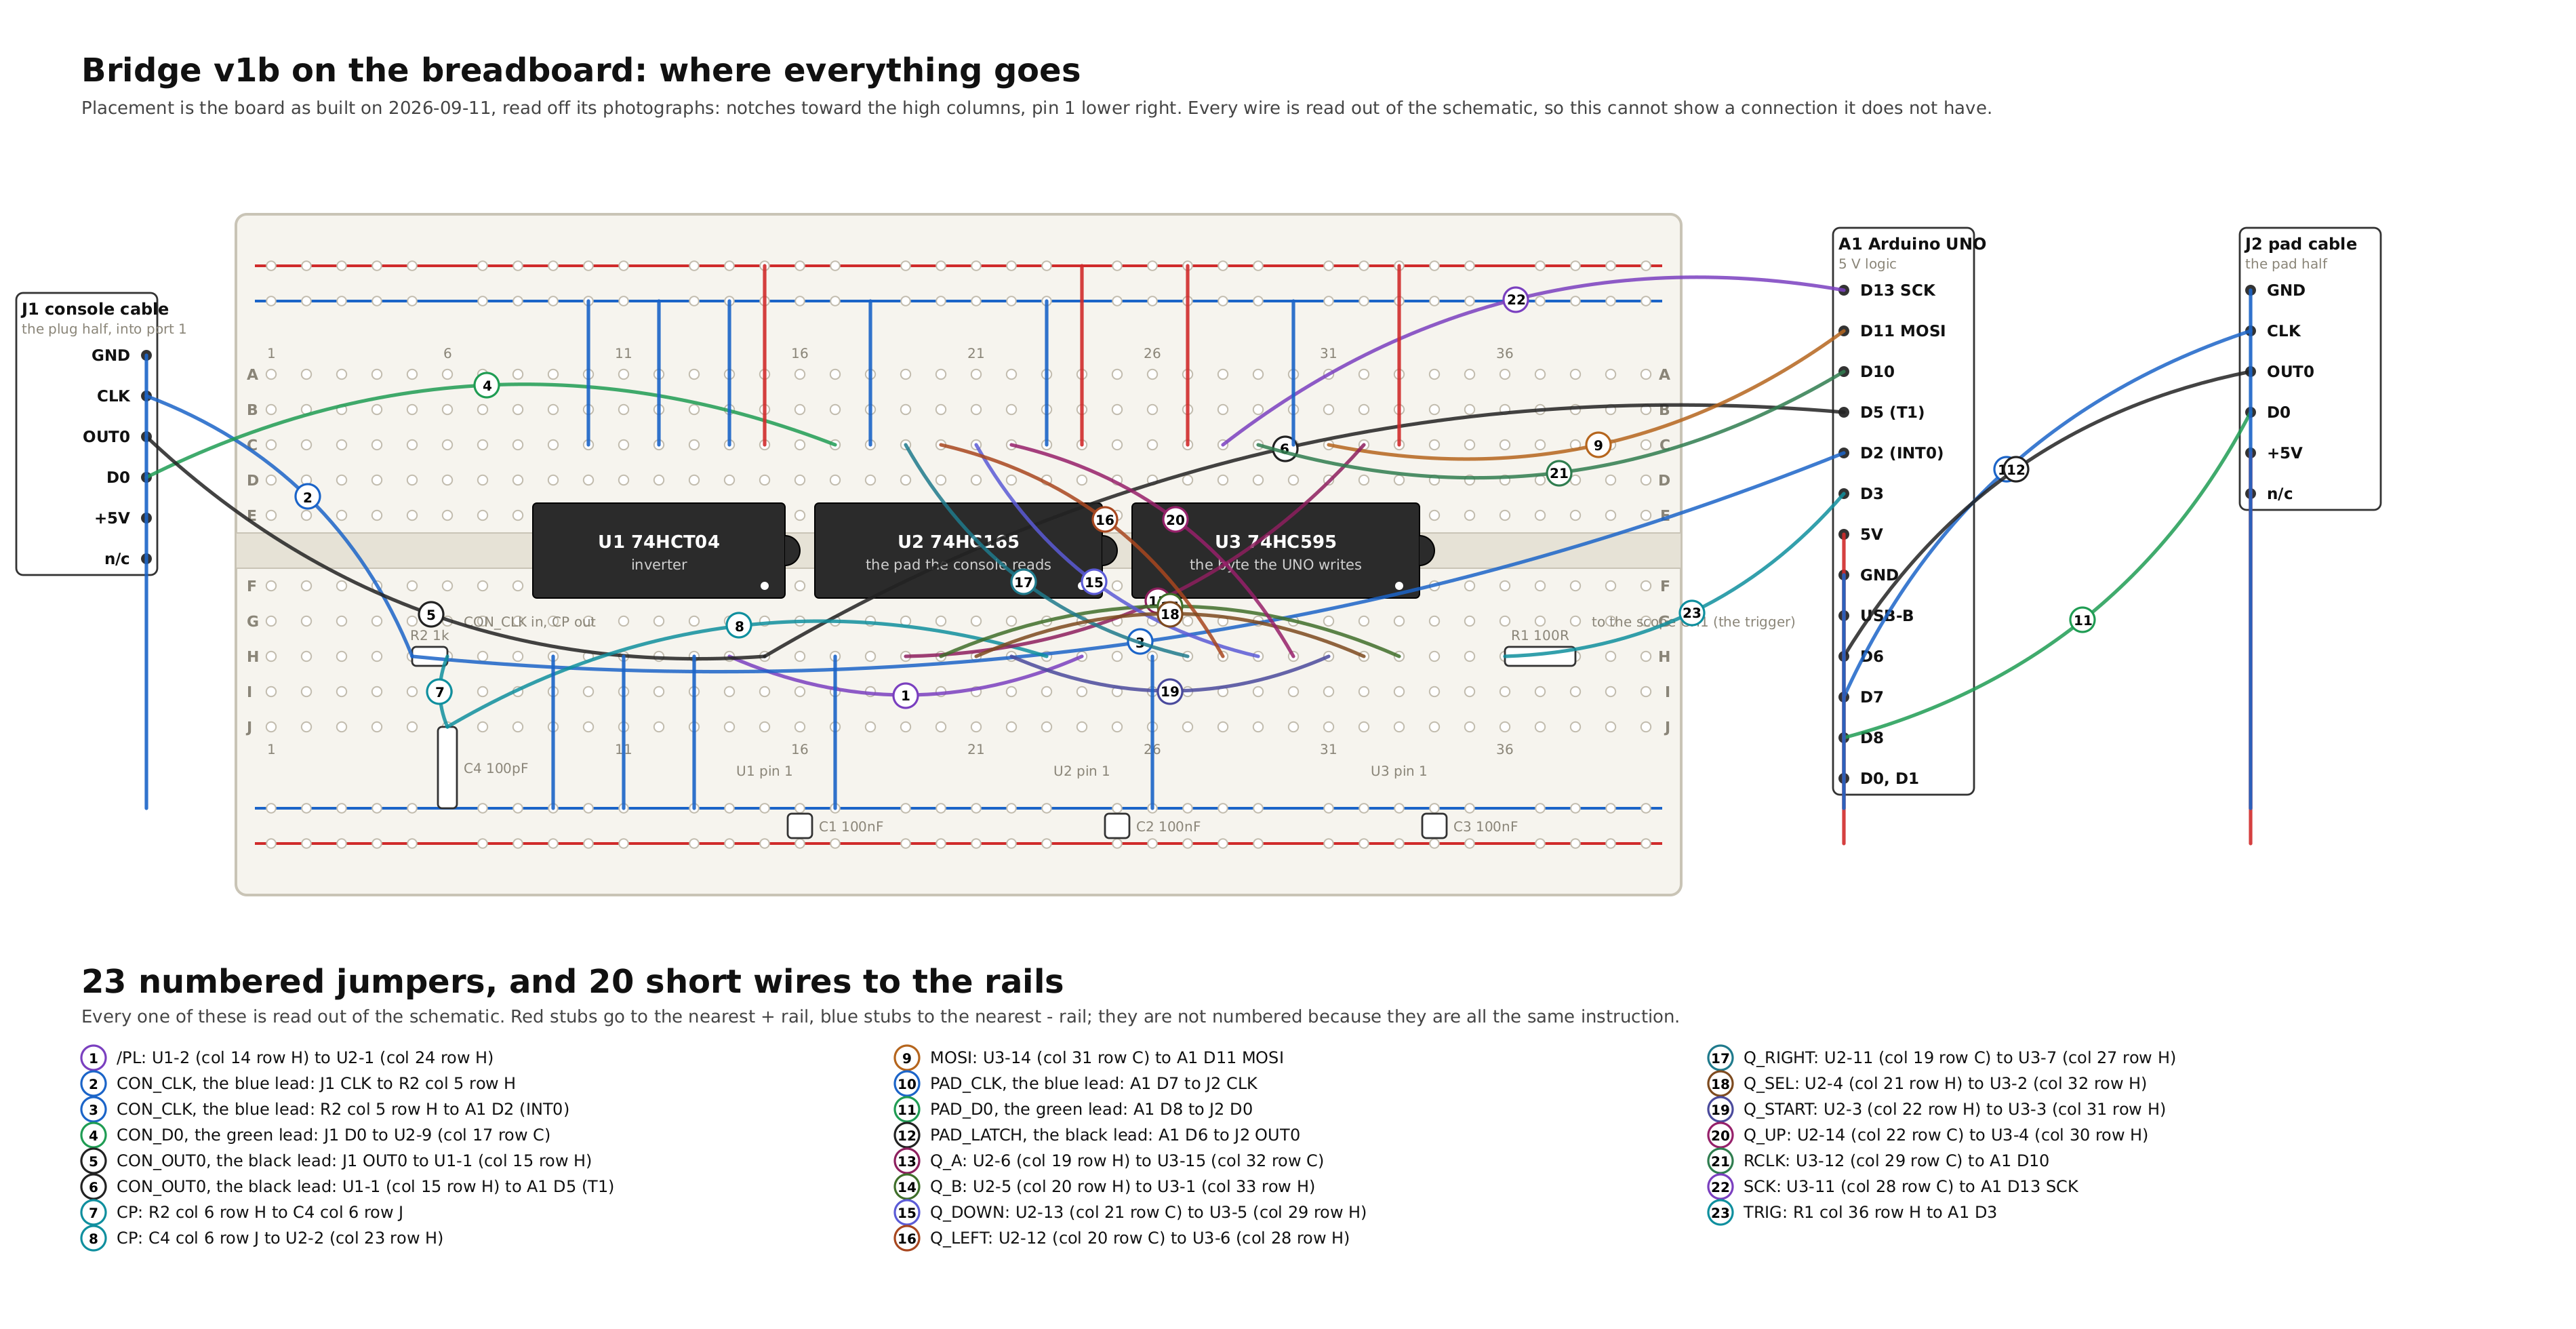
機械だけで届くマイルストーンはすべて終わった。だから模型が実機についてまだ知らないことはベンチを待っていて、次に組むのはそのベンチだ。コンソールのコントローラポートと純正パッドの間にブリッジを置く。ブリッジ上のシフトレジスタが、コンソールの読むパッドそのものになる。マイクロコントローラはポーリングの合間にボタンを書き込み、コンソールのラッチとクロックのパルスをハードウェアで数える。ネットワーク上の Raspberry Pi がスクリプトを受け取り、リセットと電源のリレーを駆動し、スコープをトリガする。スクリプトはポーリング番号ごとのボタンのバイトの列なので、模型と実機はまったく同じ入力を見る。ブリッジも模型もポーリングごとにログを取り、その二つをポーリング単位で突き合わせる。トリガした取り込みは、絵のマイルストーンが往復を採点したのと同じやり方で採点する。計画はファームウェアより先に四つのマイルストーンとその検査を名指しし、最初の一つ、コントローラポートの盗み聞きは、すでに模型を変えた。DMC のフェッチがパッドの読み出しに何をするかを問うと、スイッチレベルの 2A03 が実物より先に答え、コアと高速チップとコンソールがそれに合わせて変わった。どの変更も、それがなければ赤になるテストが守っている。いまや各マイルストーンの道具はハードウェアより先に揃っている: スクリプトをブリッジとリレーとスコープに流すヘッドから、実機と模型が食い違う最初のポーリングを探し出す仕組みまで。どれも代役に対して試し、わざと壊した走行が赤になることを確かめてある。下の図は配線表からスクリプトが生成したもので、表と食い違うことはできない。計画、配線、スクリプト、進行中の報告はノートブックに、リポジトリは github.com/tinymachines/nes-bench。
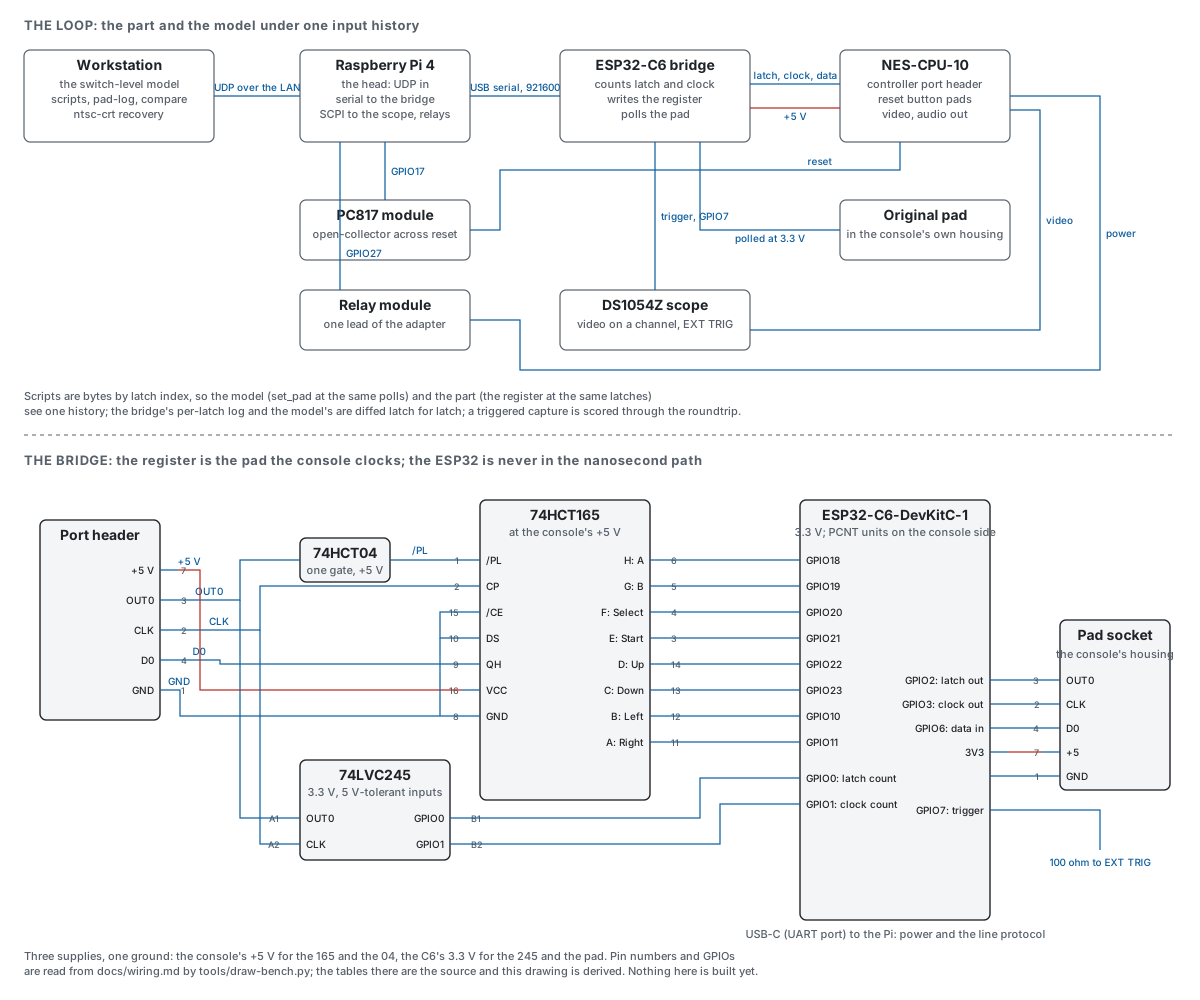
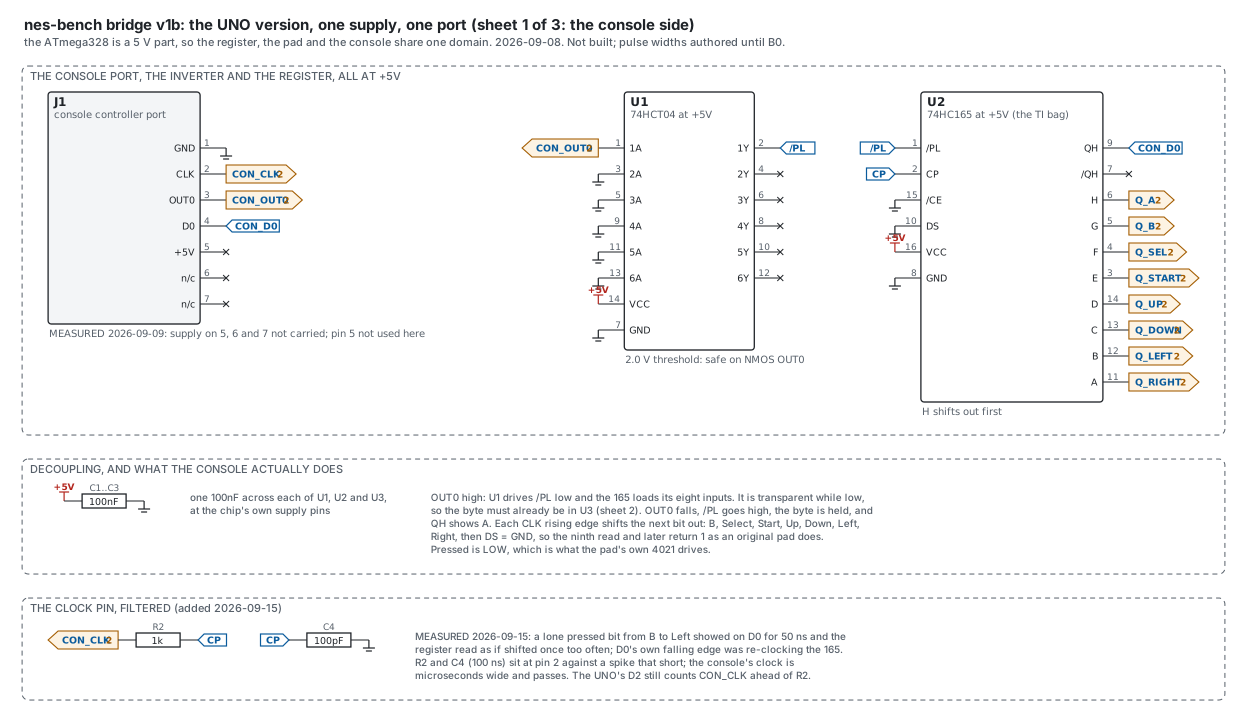
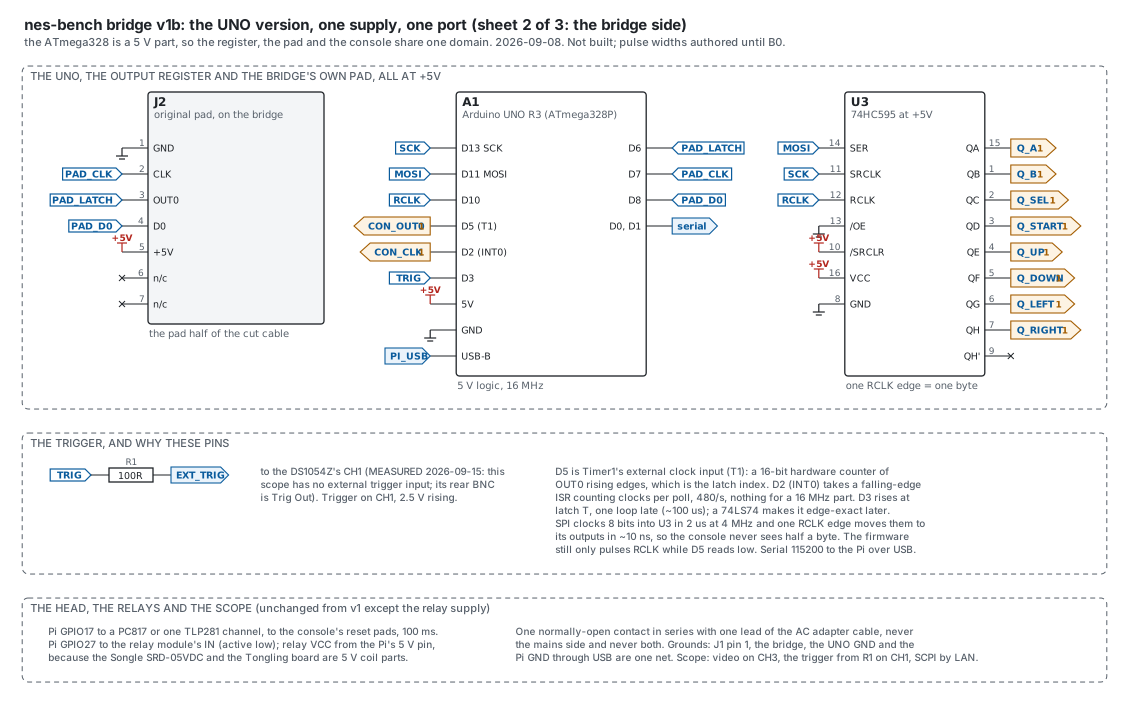
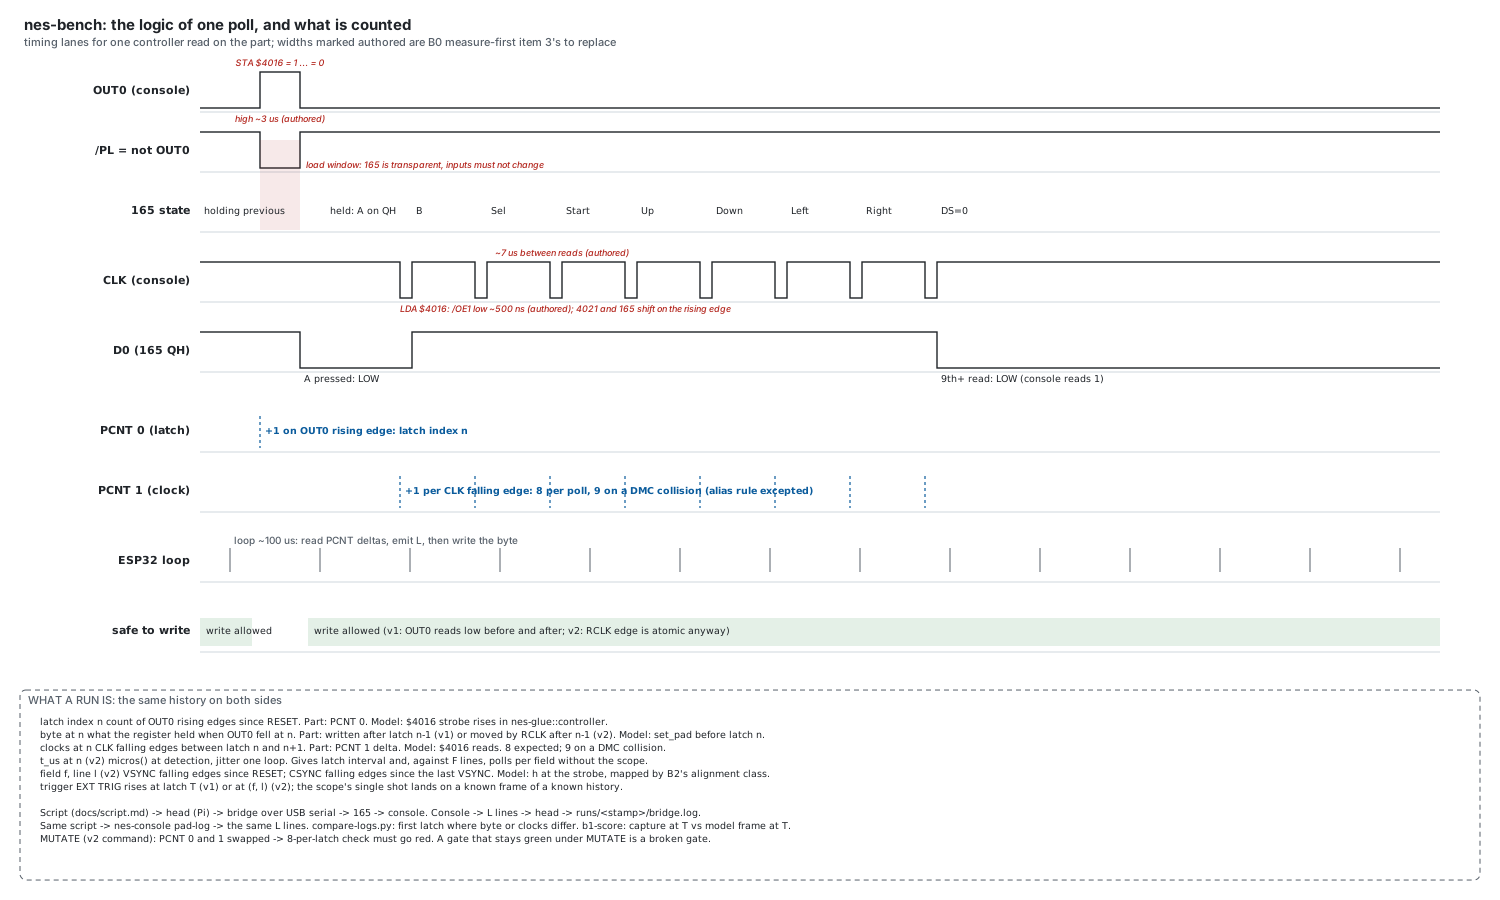
部品は机の上にあり、次は配線だ。組み立ては五回の作業として書き出してあり、一回につきコマンドは一つ。そこから返ってくるのがラボノートである。実際に組み上がっていく過程そのものだ: 十四のステップ、各ステップは意見ではなく測定で終わり、失敗した試行も含めてすべての試行を残し、各段階で写真を撮る。うち二つのステップは、このサイトがいま見積もりとしている数字を実測に置き換える: パッド自身のポートにスコープを当てて、上のタイミング図が推測しているだけのラッチとクロックのパルス幅を測り、接続したブリッジが、本当にすべてのポーリングが八クロックを運ぶのかに答える。ノートは組み立てを進める道具から生成されるので、何ひとつ手で書き込まれていない。そしてサイトは、自身のログが裏づけないノートの公開を拒む。同じ組み立ては印刷用の図面パッケージにもなっている: 横置きレターの枠付き図面で、各葉に表題欄と図番と改訂欄があり、その寸法では読めなくなる二葉だけは縮めずに大きな用紙を求めている。収めてあるのは回路図、どの部品とどのジャンパがどの穴に入るかを示すブレッドボード配置図、部品表、配線表である。この配置図で選択なのは部品の置き場所だけで、線はすべて回路図から読み出されている。だから図面にない接続を絵が示すことはできない。ブレッドボードではなく基板を欲しがるのは二ポート版のほうで、こちらには独自のパッケージがある: 回路図は四葉。部品十一点と四十二本のネットは、誰かが印刷できる一枚には収まらないからだ。その基板は配線済みである。両面、裏にグラウンド、表に電源を敷き、配線そのものは記録されたファイルで、ビルドはそれを適用するだけだ。誰かが毎回やり直す工程ではない。全ネットがつながっているか、別ネットの銅が近すぎないかは、完成した基板に対して問う。ルータ自身の報告は採らない。最初に走らせた時、ルータは基板が完成したと言いながら、三つのパッドには銅の経路がまったく無かったからだ。
ベンチの計画
ベンチは実機と模型を同じコントローラ入力の下に置く。以下は先に書かれたもの。
- Planning the bench: A real console and the model under the same controller presses: a bridge on the controller port, relays and a scope under one script, and the checks for each step.
- Wiring the bridge: The shift register that stands in for the pad, the level shifter, the microcontroller's pins, the relays, and the meter checks to do before power.
- The bench script: One file both the bench and the model read: the pad's bytes by poll, the arm, the trigger and the capture.
ベンチを組む
図面の上のブリッジと、組み上がったブリッジ: 回路図、部品、ピンごとの早見表、組み立てガイド。
- The bridge's schematics and parts: The bridge as schematics (v1 and v1b), the extended bridge (v2), one controller poll as timing lanes, and an original pad as a phone's pad; parts lists and the build order.
- The v1b bridge on an Arduino UNO: The version built first, everything at five volts: why the level shifters go away, the pin table, and four things writing the firmware showed the plan had wrong.
- The build guide, in five sittings: What to wire pin by pin, what the command then measures, which photographs to take, and where each sitting stands. Generated from the tool that runs the build.
- The bench's parts list: One table per schematic sheet, and one list of everything to gather. Generated from the file that draws the schematics, so the two cannot disagree.
- The bench cheat sheet: Both breakouts pin by pin with the harness colours, the four jumpers, and every pin of every chip with what it does and where it goes. Generated from the schematic and the lab log.
- The head's hands cheat sheet: Sheet 3 of the v1b package as tables: the Pi's four jumpers by header position, the power and reset breakout, every wire, and each pin of the PC817 and relay modules with what it does and where it goes. Generated from the schematic.
- The v1b board as built: Read off its photographs: where the chips sit and which way they face, the rails, the UNO ribbon, and where the headers should move to keep the jumpers short.
- The QA rig: The cameras and the boards on the frame, in inches and pixels: each camera's job, mount and scale, the backing board and breadboard dimensions, the bench photographed, and what to run when something moves.
- An original pad as a USB or Bluetooth keyboard: The standalone adapter, drawn to build from and built: the part read off its own silkscreen, the headers measured, the drawings, why the build moved twice (to a P4 module when the C6 would not take a flash, then from Bluetooth to USB when the module's radio link crashed), and an original pad's every button reaching a Linux host over USB.
- From a button to a keystroke, layer by layer: What travels between an original pad and a phone when the pad is a USB keyboard: the pad's shift register, the byte as a key report, the descriptor that tells the host how to read it, USB itself, then the browser's keydown; why it is not a boot keyboard, and a seven-step plan that checks one layer at a time, all seven passed, the last on a phone.
- Which ESP32 does which job: Which Espressif chips can be a Bluetooth keyboard, which a USB one and which both, read from the vendor's own headers for eight of them rather than remembered; the comparison that moved the pad onto a P4 module.
ベンチで起きたこと
写真つきで一歩ずつ進んだ組み立てと、各道具が示したことの経過報告。
- The rig locked and the bridge reading right: Three days on the bench: the v1b bridge passes bytes into the console and reads every one back, the trigger stops the scope, the cameras are on a frame; what the plan had wrong, what the eye cannot see, and what is next.
- What the bench's tools have shown: Each tool working on a synthetic run, each with a sabotage run that must fail; the chip answered the first question before the real console could, and the model changed for it.
- The lab notebook: The bench wired one step at a time, every attempt kept including the failures, each step ending in a measurement. Generated from the build tool's log.
- What is still open: Everything noticed along the way that is not finished: the calibration cart's part side, where the model's hue differs from the console's, the grabber, the bench and the cartridge reader, each with why it matters and what would close it.
ベンチでの実験
実機の絵と模型の絵の比較、そして両者が同じバイトを走らせるために模型が備えたカートリッジ。
- Eyes versus scope: The console's video split to the scope and to a USB grabber, getting the grabber to work, and the grabber's picture scored against our own decode of the scope's recording.
- A real cartridge in the model: Why the reader guessed the wrong game, the verified dump, and the mapper-66 board the model grew so the same bytes could run on both sides for a picture comparison.
- Every cartridge on the desk has a board: The seven cartridge boards the model grew, the two that could only be tested with a console around them, the screen split that needed an interrupt to become a line, and the twentieth dump, which is the multicart's first bank read alone.
ベンチを鍛える
両方のスタックを一段ずつ厳しく動かす体制と、それが自動化に教える言葉: 実機に合わせた模型、パッドから学ぶゲーム、ゲームのコードのレントゲン。
- Exercising the bench: The two stacks as one logical diagram with every flow typed, the dialect layer by layer, a regime of six steps each with its gate, and the three programmes on top: the model's knobs measured on the part, games learned from the pad to the picture, and the x-ray behind an encyclopedia of code patterns.
- The encyclopedia of code patterns: What the x-rays add up to: each NES code pattern with its signature as measured on the model, a window on the die's pages, and the mechanism it teaches; code only from cartridges whose source is ours
- Super Mario Bros., dissected: The first game taken apart on the model: the loop inside the interrupt, the frame scanline by scanline, the routine tree through the jump engine, the VRAM pipeline, and the pad's byte on its way to a jump; shape only, never the code