The console arc's notebook
We write every milestone down twice: a plan before the code, saying what will be checked and how closely, and a report afterwards, where every figure is a measurement with the run that printed it. Those documents live in their own repositories. This page pulls them in each time the site is built and sorts them by the part of the console they are about, so they are in one place and the repositories stay the only copy. When a report gives a number, the run printed it; when it calls something authored, that is a choice we made and labelled as one. The reports keep the working words we use among ourselves, and Words the reports use explains them. The calibration cartridge has a section of its own.
Grouped here by the part of the console each one is about. The same documents sorted by what they ARE, which is the question to ask first, are at the notebook by kind: plans before the work, reports after it, and the procedures, references and records between them.
Where it started
The sketch the whole console is built on, written before any of the code.
| The plan for the whole console | Sketch v0.2. What a working console means, how the parts fit together, the milestones from N0 to N8, and the decisions made along the way. |
The chips
The contract every chip speaks, then the NES's two chips at their switches (the 2A03 CPU and sound, the 2C02 picture chip) and the fast versions built from them.
| The contract the chips share | N0 report. The pin tables, the dot frame and the cartridge edge as one small crate with no dependencies, checked against the recorded reference runs. |
| The 2A03 at its switches, matching its reference exactly | A0 report. The NES's CPU and sound chip simulated transistor by transistor, bit for bit against its reference with no list of exceptions. |
| First sound from the 2A03 | A3 report. A program's note read off the chip's own output, and the mixer written down as a claim we have not yet measured. |
| Planning the fast 2A03 | N3 plan. The 6502's fast core with its decimal adjust switched off, and the sound unit as tables measured out of the chip. |
| The fast 2A03, built and checked | N3 report. The fast chip checked at its pins against the transistor-level one, the sound tables measured out of the chip, and the bus stalls frame for frame. |
| The 2C02 at its switches | P0 report. The picture chip simulated transistor by transistor, its reference run replayed, and the transistors that only work when the supply is on found. |
| The 2C02's first picture | P1 report. The picture chip driven through its simulated bus, its colour output matching the table, and the latches that power up unset named. |
| The 2C02's hard corners | P2 report. Sprite 0, the vblank read race and OAM corruption, each settled by a small register program that the reference runs too, without knowing the answer. |
| Planning the fast 2C02 | P3 plan. A picture chip that steps one dot at a time, driven by a schedule measured out of the transistor-level chip. |
| The fast 2C02, dot for dot with the chip | P3 report. The fast picture chip agreeing with the transistor-level one on three test scenes, the register writes, and the picture with rendering switched off. |
The signal
The composite video between the console and the television: the specification, each milestone of ntsc-crt, and where it knowingly departs from the references.
| The signal path's specification | Specification v0.3. The agreed plan for the NTSC signal: the sources, the decoder's filters, the television's picture stages and the capture. |
| The timing grid everything stands on | M0 report. The sample grid, the leftover phase at every step, and the data every later stage depends on. |
| The NES encoder and the first decoder | M1 report. The encoders checked against their reference, and the first decoding filter checked against blargg's. |
| The comb filters, the RGB encoder and the speed | M2 report. The decoder's notch and comb filters checked against their reference and against each other, and how fast they run. |
| Making the signal bench fast | How the signal path got several times faster, fast enough to run live in the browser: three changes named before they were built, a filter shortcut the comb tests caught being wrong, and the speeds before and after. |
| The television's picture stages | M3 report. The stages between a decoded signal and a picture on a tube, with every setting we chose labelled as a choice. |
| Capturing a real console | M4 report. The capture source, the round trip through our own model, and the first recordings of a real console scored against our own synthesis. |
| Checking what the documents claim | M5 report. A scanner that finds every number the documents state and re-checks it, the known departures from the references, and the specification agreed. |
| Where the signal path departs from the references | Each place the signal path knowingly differs from the published references, with the reason. |
The console
Both chips on one board: the glue, the machine running test ROMs, then its picture, its sound and the window it plays in.
| The mainboard's glue | N4 report. The handful of parts on the NES-001 board between the chips, each checked against its datasheet and labelled as written by us. |
| Both chips on one clock | N5 report. The console running: the two fast chips on one clock, the timing between them checked against the transistor-level chips, and blargg's test ROMs run end to end. |
| Planning the console's picture | N6 plan. The picture through the signal path, and how a captured frame will be compared, with the tolerances written down first. |
| The console's picture | N6 report. The picture through the signal path, the screen with rendering off measured on the chip, and a captured frame scored, figures recorded and not fitted. |
| Planning the console's sound | N7 plan. The sound through the board's audio stage, read off the schematic. |
| The console's sound | N7 report. The sound through the board's audio stage, blargg's mixer test ROMs cancelling, and his recordings of real hardware beside ours. |
| Planning the console's window | N8 plan. The window the console plays in, the picture on the GPU, the pacing, and a second target in the browser. |
| The console in a window | N8 report. The window built and checked without a screen, the GPU picture matching the CPU's, and the browser build measured. |
The desk
The console in the browser and the tools around it: what each window consumes, produces and saves, and how the repositories become the page.
| The desk as built | Version 1, read off the code on 2026-09-28: how seven repositories become one console in the browser, what each window on the create desk consumes, produces and saves, the seam between the page and the machine, and where a moment, a recording and a cartridge go. |
Planning the bench
The bench puts a real console and the model under the same controller presses. These were written first.
| Planning the bench | A real console and the model under the same controller presses: a bridge on the controller port, relays and a scope under one script, and the checks for each step. |
| Wiring the bridge | The shift register that stands in for the pad, the level shifter, the microcontroller's pins, the relays, and the meter checks to do before power. |
| The bench script | One file both the bench and the model read: the pad's bytes by poll, the arm, the trigger and the capture. |
Building the bench
The bridge as drawn and as built: schematics, parts, the pin-by-pin cheat sheet and the build guide.
| The bridge's schematics and parts | The bridge as schematics (v1 and v1b), the extended bridge (v2), one controller poll as timing lanes, and an original pad as a phone's pad; parts lists and the build order. |
| The v1b bridge on an Arduino UNO | The version built first, everything at five volts: why the level shifters go away, the pin table, and four things writing the firmware showed the plan had wrong. |
| The build guide, in five sittings | What to wire pin by pin, what the command then measures, which photographs to take, and where each sitting stands. Generated from the tool that runs the build. |
| The bench's parts list | One table per schematic sheet, and one list of everything to gather. Generated from the file that draws the schematics, so the two cannot disagree. |
| The bench cheat sheet | Both breakouts pin by pin with the harness colours, the four jumpers, and every pin of every chip with what it does and where it goes. Generated from the schematic and the lab log. |
| The head's hands cheat sheet | Sheet 3 of the v1b package as tables: the Pi's four jumpers by header position, the power and reset breakout, every wire, and each pin of the PC817 and relay modules with what it does and where it goes. Generated from the schematic. |
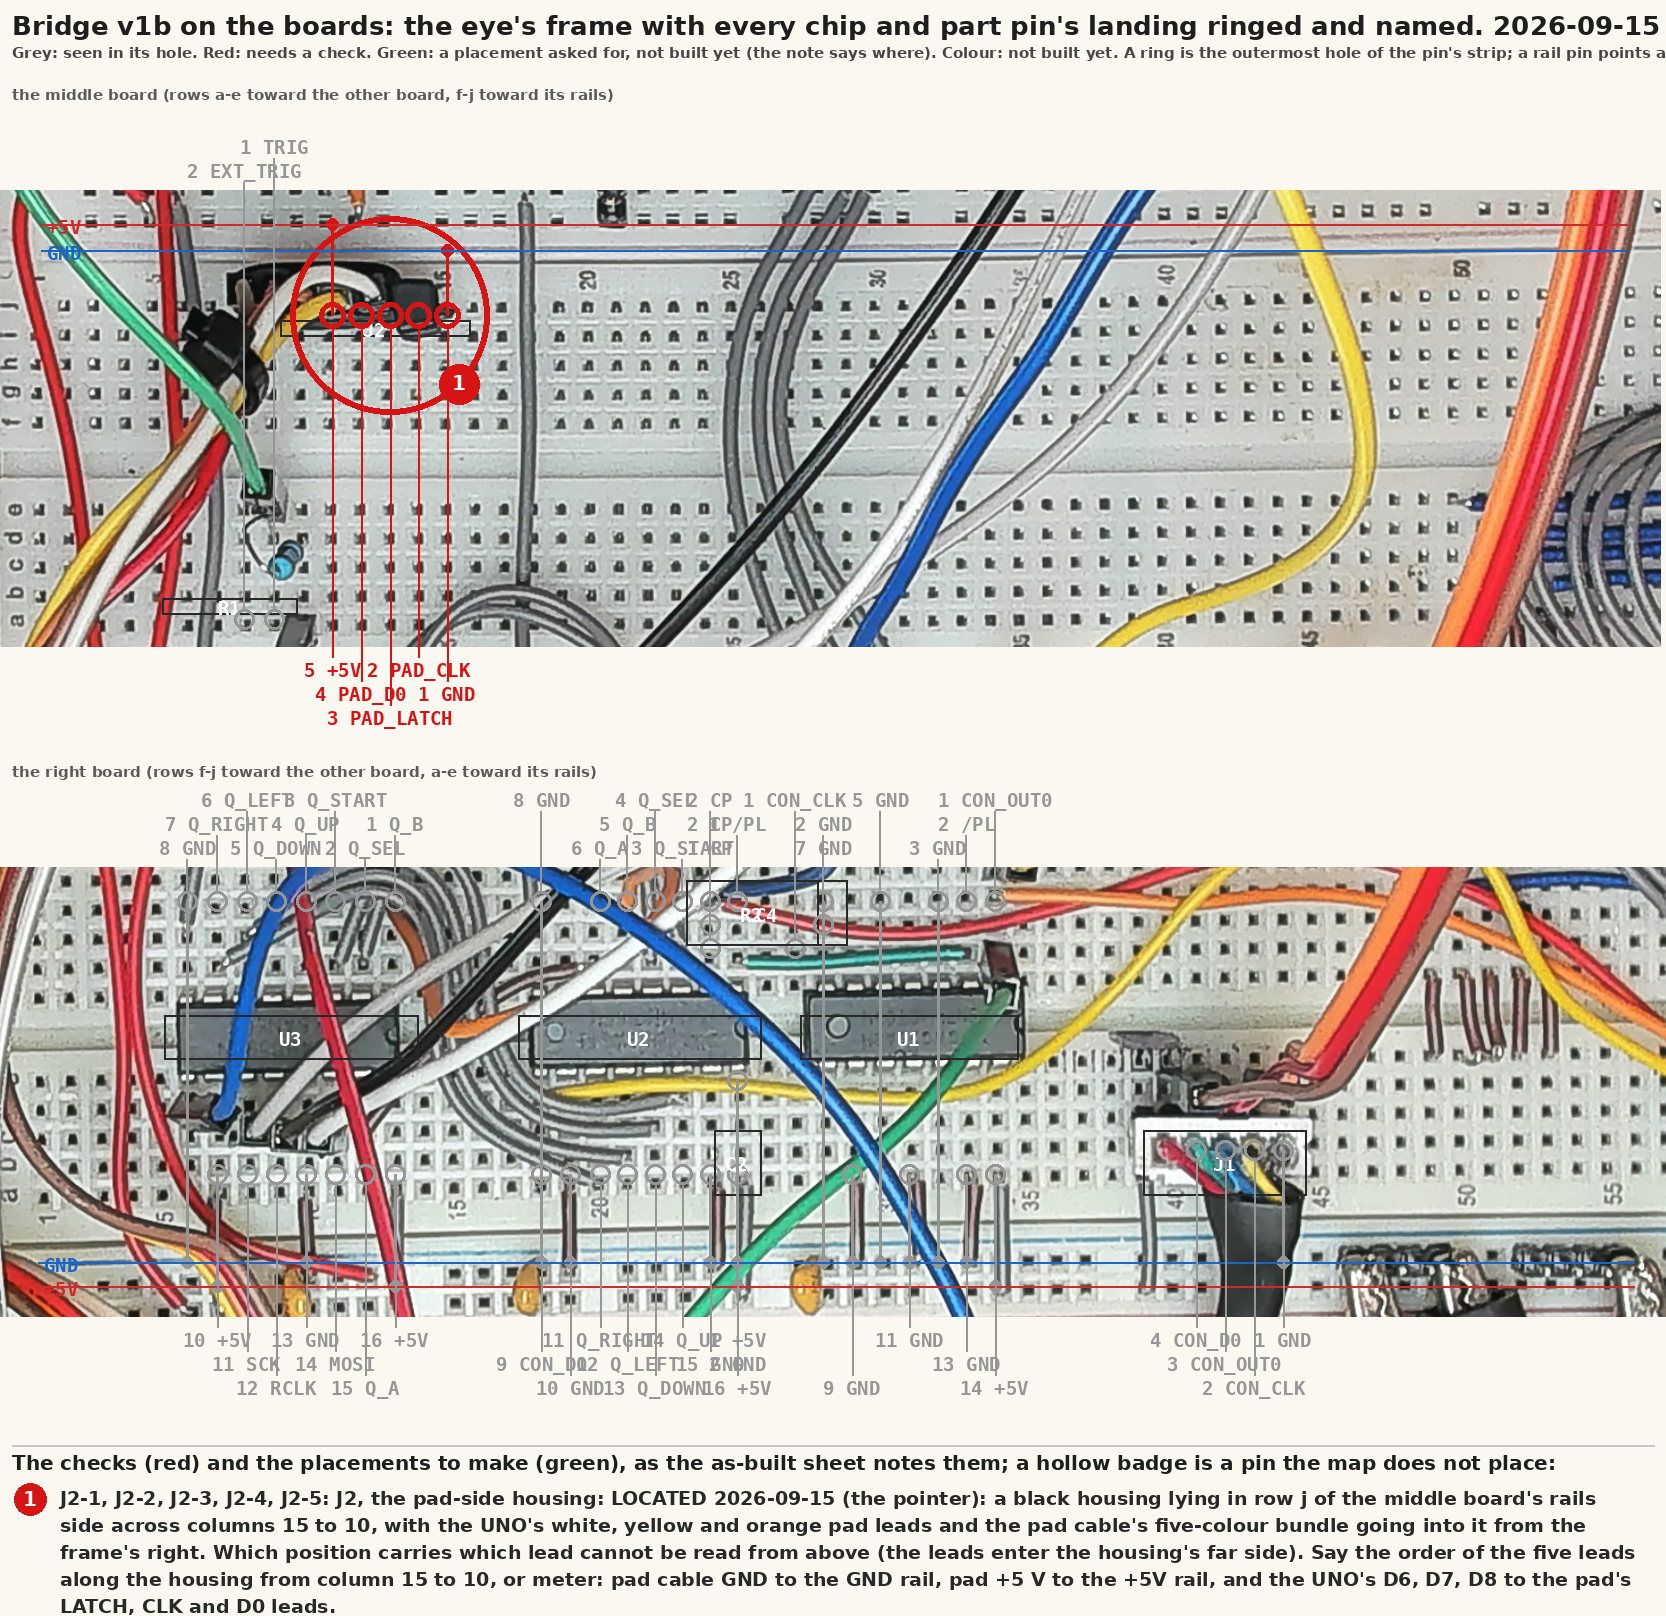
| The v1b board as built | Read off its photographs: where the chips sit and which way they face, the rails, the UNO ribbon, and where the headers should move to keep the jumpers short. |
| The QA rig | The cameras and the boards on the frame, in inches and pixels: each camera's job, mount and scale, the backing board and breadboard dimensions, the bench photographed, and what to run when something moves. |
| An original pad as a USB or Bluetooth keyboard | The standalone adapter, drawn to build from and built: the part read off its own silkscreen, the headers measured, the drawings, why the build moved twice (to a P4 module when the C6 would not take a flash, then from Bluetooth to USB when the module's radio link crashed), and an original pad's every button reaching a Linux host over USB. |
| From a button to a keystroke, layer by layer | What travels between an original pad and a phone when the pad is a USB keyboard: the pad's shift register, the byte as a key report, the descriptor that tells the host how to read it, USB itself, then the browser's keydown; why it is not a boot keyboard, and a seven-step plan that checks one layer at a time, all seven passed, the last on a phone. |
| Which ESP32 does which job | Which Espressif chips can be a Bluetooth keyboard, which a USB one and which both, read from the vendor's own headers for eight of them rather than remembered; the comparison that moved the pad onto a P4 module. |
| What is in the pile | Gear on hand for new projects, read off its photographs: ESP32 boards, optoisolator boards and an HP-16C calculator, each with what was read off the part, what comes from the part family's documentation instead, and the job it fits. |
What happened at the bench
The build, step by step with its photographs, and the running report of what each tool has shown.
| The rig locked and the bridge reading right | Three days on the bench: the v1b bridge passes bytes into the console and reads every one back, the trigger stops the scope, the cameras are on a frame; what the plan had wrong, what the eye cannot see, and what is next. |
| What the bench's tools have shown | Each tool working on a synthetic run, each with a sabotage run that must fail; the chip answered the first question before the real console could, and the model changed for it. |
| The lab notebook | The bench wired one step at a time, every attempt kept including the failures, each step ending in a measurement. Generated from the build tool's log. |
| What is still open | Everything noticed along the way that is not finished: the calibration cart's part side, where the model's hue differs from the console's, the grabber, the bench and the cartridge reader, each with why it matters and what would close it. |
Experiments at the bench
The real console's picture against the model's, and the cartridge the model grew so both could run the same bytes.
| Using an oscilloscope, for software developers | A scope as a debugger for the wire, taught on a real fault: a Geiger counter that clicked while its firmware counted nothing. The ground clip, the trigger as a breakpoint, bisecting a signal chain, scripting the scope over SCPI, and the ways the instrument itself was wrong. |
| Eyes versus scope | The console's video split to the scope and to a USB grabber, getting the grabber to work, and the grabber's picture scored against our own decode of the scope's recording. |
| A real cartridge in the model | Why the reader guessed the wrong game, the verified dump, and the mapper-66 board the model grew so the same bytes could run on both sides for a picture comparison. |
| Every cartridge on the desk has a board | The seven cartridge boards the model grew, the two that could only be tested with a console around them, the screen split that needed an interrupt to become a line, and the twentieth dump, which is the multicart's first bank read alone. |
Exercising the bench
The regime that drives both stacks harder one step at a time, and the words it teaches the automation: the model tuned to the part, games learned from the pad, and the x-ray of a game's code.
| Exercising the bench | The two stacks as one logical diagram with every flow typed, the dialect layer by layer, a regime of six steps each with its gate, and the three programmes on top: the model's knobs measured on the part, games learned from the pad to the picture, and the x-ray behind an encyclopedia of code patterns. |
| Super Mario Bros., level by level, on the part | The bench playing Super Mario Bros. on a real console from power-on, level after level from 1-1 in one schedule of button presses found on the model: how each level was searched, replayed and played on the part, a drawing per level made from numbers alone, and what each one taught. |
| The encyclopedia of code patterns | What the x-rays add up to: each NES code pattern with its signature as measured on the model, a window on the die's pages, and the mechanism it teaches; code only from cartridges whose source is ours |
| Super Mario Bros., dissected | The first game taken apart on the model: the loop inside the interrupt, the frame scanline by scanline, the routine tree through the jump engine, the VRAM pipeline, and the pad's byte on its way to a jump; shape only, never the code |
Printable
The bench's drawing packages, built from the committed schematics on every deploy:
NES controller-port bridge, v1b: drawing package TM-NESB-001 rev P (PDF); NES controller-port bridge, v2b: drawing package TM-NESB-002 rev A (PDF); Original pad to a USB or Bluetooth keyboard, pad-ble v1: drawing package TM-NESB-003 rev M (PDF); Geiger TRNG emitter: the detector and an ESP32-C6 in a box: drawing package TM-TRNG-001 rev F (PDF); Using an oscilloscope, for software developers (PDF); v2b board, top copper (SVG); v1b as built, the checks called out on the photograph (PNG).